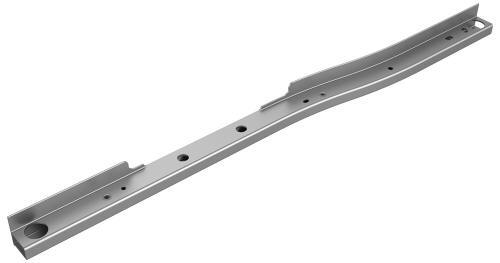
Tesla Model 3: Beam - 12V Battery (RWD) - Remove
Tesla Model 3 2017-2025 Service Manual / Electrical / 12V Battery and Fuses / Beam - 12V Battery (RWD) (Remove and Replace) / Beam - 12V Battery (RWD) - Remove

Remove
- Remove the 2nd row lower seat cushion. See Seat Cushion - Lower - 2nd Row (Remove and Replace).
- Remove the rear underhood apron. See Underhood Apron - Rear (Remove and Replace).
- Remove the cabin intake duct. See Duct - Cabin Intake (Remove and Replace).
- Remove the hood latch cover. See Cover - Hood Latch (Remove and Replace).
- Remove the underhood storage unit. See Underhood Storage Unit (Remove and Replace).
- Disconnect 12V power. See 12V Power (Disconnect and Connect).
- Remove the 12V auxiliary battery. See Battery - 12V (Remove and Replace).
- Remove the 12V battery bracket. See Bracket - 12V Battery (RWD) (Remove and Replace).

- Release the clips that attach the coolant hoses and electrical harnesses to the 12V battery bracket beam.

- Remove the bolts that attach the front controller to the 12V battery bracket beam.

- Remove the bolts that attach the 12V battery bracket beam to the body.
- Remove the 12V battery bracket beam from the vehicle.
Note: Maneuver the 12V battery bracket beam to ease removal from
the vehicle.
READ NEXT:
 Beam - 12V Battery (RWD) - Install
Install
Install the 12V battery bracket beam on the vehicle.
Caution:
Keep the 12V battery ground terminal away to avoid catching between the
beam and the bracket.
Install the bolts that atta
Bracket - 12V Battery (Dual Motor) (Remove and Replace)
Remove
Remove the 2nd row lower seat cushion. See
Seat Cushion - Lower - 2nd Row (Remove and Replace).
Remove the rear underhood apron. See
Underhood Apron - Rear (Remove and Replace).
Remove
SEE MORE:
Brake Pedal - Remove
Remove
Remove the 2nd row lower seat cushion. See Seat
Cushion - Lower - 2nd Row (Remove and Replace).
Remove the rear underhood apron. See Underhood Apron
- Rear (Remove and Replace).
Disconnect 12V p
Seal - Secondary - Front Door - LH (Remove and Replace)
Remove
Open the LH front door.
Use narrow-width tape to carefully mark the location of the secondary
seal around the door.
Caution:
Make sure that the edge of the tape accurately follows the edge of the
seal.
Release the ends of the door secondary seal from the rear of the inner
be
© 2019-2025 Copyright www.tmodel3.com
