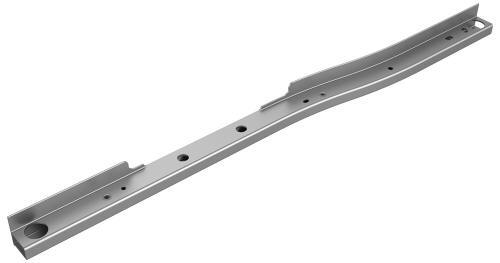
Tesla Model 3: Beam - 12V Battery (RWD) (Remove and Replace)
Tesla Model 3 2017-2025 Service Manual / Electrical / 12V Battery and Fuses / Beam - 12V Battery (RWD) (Remove and Replace)
Beam - 12V Battery (RWD) - Remove

Remove
- Remove the 2nd row lower seat cushion. See Seat Cushion - Lower - 2nd Row (Remove and Replace).
- Remove the rear underhood apron. See Underhood Apron - Rear (Remove and Replace).
- Remove the cabin intake duct. See Duct - Cabin Intake (Remove and Replace).
- Remove the hood latch cover. See Cover - Hood Latch (Remove and Replace).
- Remove the underhood storage unit. See Underhood Storage Unit (Remove and Replace).
- Disconnect 12V power. See 12V Power (Disconnect and Connect).
- Remove the 12V auxiliary battery. See Battery - 12V (Remove and Replace).
- Remove the 12V battery bracket. See Bracket - 12V Battery (RWD) (Remove and Replace).

- Release the clips that attach the coolant hoses and electrical harnesses to the 12V battery bracket beam.

- Remove the bolts that attach the front controller to the 12V battery bracket beam.

- Remove the bolts that attach the 12V battery bracket beam to the body.
- Remove the 12V battery bracket beam from the vehicle.
Note: Maneuver the 12V battery bracket beam to ease removal from
the vehicle.
Beam - 12V Battery (RWD) - Install
Install
- Install the 12V battery bracket beam on the vehicle.
Caution:
Keep the 12V battery ground terminal away to avoid catching between the beam and the bracket.
- Install the bolts that attach the 12V battery bracket beam to the body.
 Torque 9 Nm
- Install the bolts that attach the front controller to the 12V battery
bracket beam.
 Torque 10 Nm
- Install the clips that attach the coolant hoses and electrical harnesses to the 12V battery bracket beam.
- Install the 12V battery bracket. See Bracket - 12V Battery (RWD) (Remove and Replace).
- Install the 12V auxiliary battery. See Battery - 12V (Remove and Replace).
- Reconnect 12V power. See 12V Power (Disconnect and Connect).
- Install the underhood storage unit. See Underhood Storage Unit (Remove and Replace).
- Install the hood latch cover. See Cover - Hood Latch (Remove and Replace).
- Install the rear underhood apron. See Underhood Apron - Rear (Remove and Replace).
- Install the 2nd row lower seat cushion. See Seat Cushion - Lower - 2nd Row (Remove and Replace).
READ NEXT:
 Bracket - 12V Battery (Dual Motor) (Remove and Replace)
Remove
Remove the 2nd row lower seat cushion. See
Seat Cushion - Lower - 2nd Row (Remove and Replace).
Remove the rear underhood apron. See
Underhood Apron - Rear (Remove and Replace).
Remove
SEE MORE:
Seatbelt - 2nd Row - LH (Remove and Replace)
Remove
Remove the rear underhood apron. See Underhood Apron - Rear (Remove and
Replace).
Remove the cabin intake duct. See Duct - Cabin Intake (Remove and
Replace).
Disconnect 12V power. See 12V Power (Disconnect and Connect).
Remove the LH 2nd row seat side bolster. See Bolster - Side -
Harness - Trunk (Remove and Replace)
Harness - Trunk- Remove
Remove
Remove the package tray trim. See Trim - Package Tray (Remove and
Install).
Disconnect the trunk electrical harness connectors.
Remove and discard the bolt that attaches the ground strap to the body.
Push the trunk electrical wiring harness through
© 2019-2025 Copyright www.tmodel3.com

