Tesla Model 3: Tube - Input - Coolant - Power Conversion System- Remove
Tesla Model 3 2017-2025 Service Manual / Battery System / HV Battery Cooling System / Tube - Input - Coolant - Power Conversion System (Remove and Replace) / Tube - Input - Coolant - Power Conversion System- Remove

SPECIAL TOOLS
Connector Removal, Coolant, PCS, M3 (1111868-00-B)
Kit, Svc Plug, Cooling Hose, Model 3 (1135762-00-A)
Warning:
Only technicians who have been trained in High Voltage Awareness are permitted to perform this procedure. Proper personal protective equipment (PPE) and insulating HV gloves with a minimum rating of class 0 (1000V) must be worn at all times a high voltage cable, busbar, or fitting is handled. Refer to Tech Note TN-15-92-003, "High Voltage Awareness Care Points" for additional safety information.
Remove
- Drain the coolant from the power conversion system. See Penthouse Coolant (Drain and Refill).
- Remove the pyrotechnic battery disconnect from the penthouse. See Pyrotechnic Battery Disconnect (Remove and Replace).
- Remove the high voltage controller. See Controller - High Voltage (Remove and Replace).
- Release the clips that attach the harness to the hinge tray and hinges.
- Raise the hinge tray and remove the hinge tray from the hinges.
- Cut a slit halfway through 2 absorbent pads and surround each coolant input tube fitting with a pad.
 Example of Coolant Connector Removal Tool Use
- Use the coolant connector removal tool to spread the tube fitting clips wider than the barb on the power conversion system.
- Pull up on the tool and the tube fitting together to disconnect the fitting from the power conversion system
- Repeat step 7 and step 8 for the other tube fitting at the battery flange.
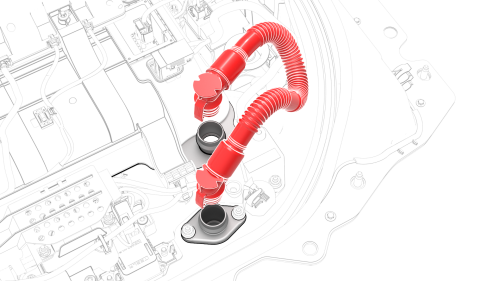
- Remove the tube from the vehicle.

- Install a plugs into the power conversion system and the battery flange.
- Wipe up any spilled coolant.
Caution: Spilled coolant can create an electrical path.
READ NEXT:
 Tube - Input - Coolant - Power Conversion System- Install
Install
Wipe up any spilled coolant
Caution: Spilled coolant can create an
electrical path.
O-rings in good condition
Make sure that the o-rings are not damaged and that they are properl
Tube - Input - Coolant - Power Conversion System-
Remove
SPECIAL TOOLS
Connector Removal, Coolant, PCS, M3 (1111868-00-B)
Kit, Svc Plug, Cooling Hose, Model 3 (1135762-00-A)
Warning:
Only technicians who have been trained in High Voltage Awareness are
p
SEE MORE:
Sensor - Relative Humidity and Temperature (Remove and Replace)
Remove
Remove the lower quad camera cover. See Quad Camera Cover - Lower
(Remove and Replace).
Remove the rear view mirror. See Mirror - Rear View (Remove and
Replace).
Remove the forward facing camera. See Camera - Forward Facing (Remove
and Replace).
Disconnect the electrical co
Polish
Remove the cutting pad from the buffer, and then install a polishing pad on
the buffer.
Apply 4 evenly spaced 20 mm diameter dollops of polishing compound on the
polishing pad.
Set the buffer speed according to region, and while the buffer is off, place
the tool on top of the affected area.
NA:
© 2019-2025 Copyright www.tmodel3.com
