Tesla Model 3: Tube - Input - Coolant - Power Conversion System- Install
Tesla Model 3 2017-2025 Service Manual / Battery System / HV Battery Cooling System / Tube - Input - Coolant - Power Conversion System (Remove and Replace) / Tube - Input - Coolant - Power Conversion System- Install
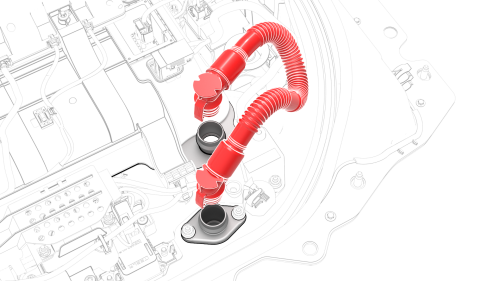
Install
- Wipe up any spilled coolant
Caution: Spilled coolant can create an electrical path.
 O-rings in good condition
- Make sure that the o-rings are not damaged and that they are properly seated in the connector groove prior to inserting the tube into the power conversion system. Replace components as necessary.
 O-ring in poor condition
- Lubricate the coolant input tube o-rings with Silaramic lubricant.
- Remove the plugs from the power conversion system and the battery flange.
- Install the coolant input tube into the power conversion system and the battery flange.
 Example of a Secure Connection
- Firmly press down on the tube fittings, to make sure that the fittings are securely connected.
Caution:
Verify that both clips have fully engaged the barb on the power conversion system and battery flange, and then pull up on the fittings to check retention.
- Remove the absorbent pads from around the coolant input tube fittings, and wipe up any spilled coolant.
Caution:
Spilled coolant can create an electrical path.
- Perform a penthouse coolant leak test. See Penthouse Coolant Leak Test.
- Connect the 12V auxiliary battery negative terminal only.
.png) Torque 6 Nm
Torque 6 Nm
Caution: Do not follow the procedure to connect 12V power at this time.
- Connect a 12V charger to the 12V auxiliary battery terminals.
- Refill the coolant. See Penthouse Coolant (Drain and Refill).
- On the touchscreen, touch Controls > Safety & Security > Vehicle Power > Power Off.
- Disconnect the 12V charger from the 12V auxiliary battery terminals.
- Disconnect the 12V auxiliary battery negative terminal.
- Install the hinge tray into the hinges, and then lower the hinge tray.
- Fasten the clips that attach the harness to the hinge tray and hinges.
- Install the high voltage controller. See Controller - High Voltage (Remove and Replace).
- Install the pyrotechnic battery disconnect into the penthouse. See Pyrotechnic Battery Disconnect (Remove and Replace).
READ NEXT:
 Tube - Input - Coolant - Power Conversion System-
Remove
Tube - Input - Coolant - Power Conversion System-
Remove
SPECIAL TOOLS
Connector Removal, Coolant, PCS, M3 (1111868-00-B)
Kit, Svc Plug, Cooling Hose, Model 3 (1135762-00-A)
Warning:
Only technicians who have been trained in High Voltage Awareness are
p
Tube - Input - Coolant - Power Conversion System-
Install
Install
Wipe up any spilled coolant.
Caution: Spilled coolant can create an
electrical path.
O-rings in good condition
Make sure that the o-rings are not damaged and that they are proper
SEE MORE:
Fuse - Cabin Heater - HV Battery- Install
Install
Install the PTC heater fuse to the RH penthouse bus, and then install
new nuts to attach the fuse to the bus.
Torque 2.5 Nm
Generic Measurement - Actual busbars and fasteners might appear
different
Use the Hioki resistance meter to measure the resistance at the HV joint
betwe
Hinge - Trunk - LH (Remove and Replace)
Remove
Remove the trunk assembly. See Trunk (Remove and Install).
Remove the LH side trunk trim. See Trim - Side - Trunk - LH (Remove and
Replace).
Use masking tape to mark the position of the trunk hinge on the body.
Remove the LH trunk gas strut. See Gas Strut - Trunk - LH (Remove and
© 2019-2025 Copyright www.tmodel3.com
