Tesla Model 3: Pressure Transducer - High Pressure (Remove and Replace)
Tesla Model 3 2017-2025 Service Manual / Thermal Management / Refrigerant System / Pressure Transducer - High Pressure (Remove and Replace)
Remove
- Remove the underhood storage unit. See Underhood Storage Unit (Remove and Replace).
- Perform the A/C refrigerant recovery. See A/C Refrigerant (Recovery and Recharge).
- Remove the outer HVAC plenum duct. See Duct - HVAC Plenum - Outer (Remove and Replace).
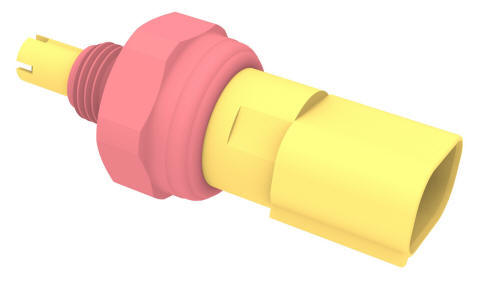
- Disconnect the electrical harness from the high pressure transducer connector.
.png)
- Remove the high pressure transducer from the discharge pipe.
.png) Torque 7 Nm
Torque 7 Nm
Install
Installation procedure is the reverse of removal, except for the following: Perform the A/C refrigerant recharge. See A/C Refrigerant (Recovery and Recharge).
READ NEXT:
 Pressure Transducer - Low Pressure (Remove and Replace)
Remove
Recover the A/C refrigerant. See A/C Refrigerant (Recovery and Recharge).
Note: Completely recover the refrigerant before continuing this
procedure.
Disconnect 12V power. See 12V Power
Receiver Dryer and Desiccant (Remove and Replace)
Receiver Dryer and Desiccant- Remove
SPECIAL TOOLS
Remove
Perform the A/C refrigerant recovery. See A/C Refrigerant (Recovery and
Recharge).
Remove the bolts (x2) that attach the underhood
SEE MORE:
Charging
General
Tesla Model 3 is a battery electric vehicle, meaning the High Voltage (HV)
battery needs to be charged by a charging station after finishing driving. The
touchscreen and smart phone app inform the driver of the state of charge and the
expected remaining range
The charge port is located on
Hose - Chiller to Car Computer and HV Battery Supply Manifold (Dual Motor) (Remove
and Replace)
SPECIAL TOOLS
Plug,Car Computer Fluid Port (1119171-00-A)
Kit, Svc Plug, Cooling Hose, Model 3 (1135762-00-A)
Remove
Remove the front subframe assembly. See Subframe Assembly - Front (Dual
Motor) (Remove and Install).
Disconnect the electrical harness from the chiller and EXV assembly hos
© 2019-2025 Copyright www.tmodel3.com
