Tesla Model 3: Knuckle - Suspension - Front - LH (Dual Motor) - Remove
Tesla Model 3 2017-2025 Service Manual / Suspension / Front Suspension (Including Hubs) / Knuckle - Suspension - Front - LH (Dual Motor) (Remove and Replace) / Knuckle - Suspension - Front - LH (Dual Motor) - Remove

Remove
- If equipped, remove the LH front wheel center cap. See Cap - Wheel (Remove and Replace).
- Loosen the LH front wheel lug nuts.
Caution: Use only hand tools to remove or install the fasteners. Do not use impact or power tools.
Caution: Use a 6 point socket. Do not use a 12 point socket or a specialty socket.
.png)
- Loosen the LH front drive unit halfshaft nut.
- Raise the vehicle, and then remove the LH front wheel. See Wheel (Remove and Install).
.png)
- Remove and discard the LH front drive unit halfshaft nut and washers.
Note: The washers are attached to the nut.
- Position the hub puller tool onto the LH front wheel studs, and then hand-tighten the wheel lug nuts (x5).
- Remove the LH front drive unit halfshaft from the LH front hub assembly, and then set the halfshaft aside.
Note: While holding the hub in position, turn the hydraulic hub puller tool handle clockwise to separate the LH front drive unit halfshaft from the hub assembly.
- Remove the hub puller tool from the LH front wheel studs.

- Remove the bolt that attaches the LH front brake hose bracket to the LH front suspension knuckle.
- Remove and discard the bolts that attach the LH front brake caliper to the LH front suspension knuckle, and then use an S-hook to hang the caliper off of the vehicle.
- Remove the LH front brake rotor. See Brake Rotor - Front - LH (Remove and Replace).
.jpg)
- Remove the bolts that attach the LH front hub to the LH front knuckle.

- Remove the LH front hub from the vehicle.
- Remove the LH front brake dust shield. See Shield - Dust - Brake - Front - LH (Remove and Replace).

- Remove and discard the bolts that attach the LH front ABS wheel speed sensor and electrical harness to the LH front suspension knuckle.

- Release the clip that attaches the LH front ABS wheel speed sensor electrical harness to the LH front suspension knuckle.

- Remove and discard the nut that attaches the LH tie rod end to the LH front suspension knuckle, and then remove the tie rod end from the knuckle.
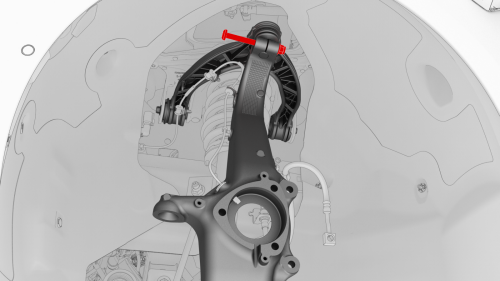
- Remove the bolt and discard the nut that attach the LH upper control arm to the LH front suspension knuckle.

- Remove and discard the nut that attaches the LH front lower compliance link to the front suspension knuckle.
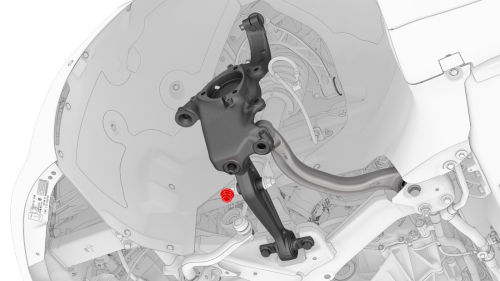
- Remove and discard the nut that attaches the LH front lower lateral link to the LH front suspension knuckle.
- Remove the LH front suspension knuckle from the vehicle.

READ NEXT:
 Knuckle - Suspension - Front - LH (Dual Motor) -
Install
Knuckle - Suspension - Front - LH (Dual Motor) -
Install
Install
Rest the LH front drive unit half shaft in the LH front suspension
knuckle, and then install a new nut that attaches the knuckle to the lower
lateral link.
Torque
180 Nm
Instal
Knuckle - Suspension - Front - LH (RWD) (Remove and Replace)
Remove
Remove the LH front brake dust shield. See
Shield - Dust - Brake - Front - LH (Remove and Replace).
Remove the bolts that attach the LH front ABS wheel speed sensor
electrical harne
Link - Compliance - Lower - Front - LH (Remove and Replace)
Remove
Remove the LH front wheel arch liner. See
Wheel Arch Liner - Front - LH (Remove and Replace).
Remove the front aero shield panel. See
Panel - Aero Shield - Front (Remove and Replace).
SEE MORE:
Cap - Penthouse HV (Remove and Replace)
Remove
Remove the 2nd row lower seat cushion. See
Seat Cushion - Lower - 2nd Row (Remove and Replace).
Lift the HV cap straight up from over the DC input connector on the LH
side of the penthouse, and then remove the HV cap from the vehicle.
Install
Installation procedure is the reverse
Tweeter - Front Door - LH (Remove and Replace)
Remove
Pull straight up to release the clips that attach the LH front door
tweeter assembly to the door.
Caution: Do not pull the tweeter assembly too far from the door panel,
as the tweeter electrical connector is still attached.
Disconnect the electrical connector from the tweeter, and
© 2019-2025 Copyright www.tmodel3.com
