Tesla Model 3: Knuckle - Suspension - Front - LH (Dual Motor) - Install
Tesla Model 3 2017-2025 Service Manual / Suspension / Front Suspension (Including Hubs) / Knuckle - Suspension - Front - LH (Dual Motor) (Remove and Replace) / Knuckle - Suspension - Front - LH (Dual Motor) -
Install
Install
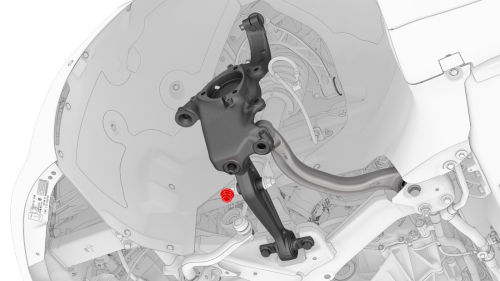
- Rest the LH front drive unit half shaft in the LH front suspension
knuckle, and then install a new nut that attaches the knuckle to the lower
lateral link.
 Torque
180 Nm
Torque
180 Nm

- Install a new nut that attaches the LH front lower compliance link to
the LH front suspension knuckle.
 Torque 180 Nm
Note: Use a T45 bit to hold the LH front lower compliance link in position.
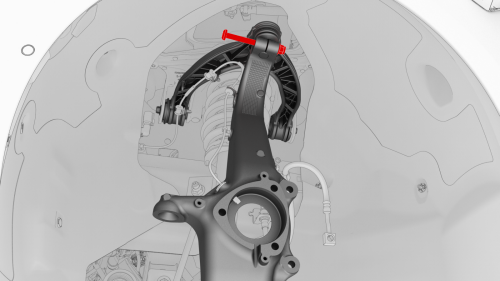
- Install the bolt and new nut that attach the LH upper control arm to the
LH front suspension knuckle.
 Torque 56 Nm
 Torque 56 Nm

- Install a new nut that attaches the LH tie rod end to the LH front
suspension knuckle.
 Torque 180 Nm

- Install new bolts that attach the LH front ABS wheel speed sensor and
electrical harness to the LH front suspension knuckle.
 Torque 5 Nm

- Install the clip that attaches the LH front ABS wheel speed sensor electrical harness to the LH front suspension knuckle.
- Install the LH front brake dust shield. See Shield - Dust - Brake - Front - LH (Remove and Replace).
- Use a magnetic field viewing card to check the LH front hub's tone ring.

- Apply approximately 1 gram of Molykote M-77 Lubricant Paste only to the hub mating face on the outboard side of the LH front drive unit halfshaft.
Caution: Do not apply any lubricant to the halfshaft splines. If lubricant is mistakenly applied, wipe the splines clean with a shop towel.

- Position the LH front hub on the LH front suspension knuckle, and then insert the LH front halfshaft in the hub.
.jpg)
Halfshaft hidden for clarity
- Install the bolts that attach the LH front hub to the LH front knuckle.
 Torque 85 Nm
 - Install the LH front brake rotor. See Brake Rotor - Front - LH (Remove and Replace).

Halfshaft hidden for clarity
- Remove the S-hook, and then install the new bolts that attach the LH
front brake caliper to the LH front suspension knuckle.
 Torque 94 Nm

- Install the bolt that attaches the LH front brake hose bracket to the LH
front suspension knuckle.
 Torque 5 Nm
.png)
- Hand-tighten the new front drive unit halfshaft nut and washers.
- Position the LH front wheel on the vehicle, and then hand-tighten the LH front wheel lug nuts.
- Lower the vehicle until the tires are touching the ground, and then fully tighten the LH front wheel lug nuts. See Wheel (Remove and Install).
- Fully tighten the new front drive unit halfshaft nut and washers.
 Torque 245 Nm
 - If equipped, install the LH front wheel center cap. See Cap - Wheel (Remove and Replace).
- Perform a 4 wheel alignment. See Four Wheel Alignment (Check and Adjust).
- Perform a test drive.
READ NEXT:
 Knuckle - Suspension - Front - LH (RWD) (Remove and Replace)
Remove
Remove the LH front brake dust shield. See
Shield - Dust - Brake - Front - LH (Remove and Replace).
Remove the bolts that attach the LH front ABS wheel speed sensor
electrical harne
Link - Compliance - Lower - Front - LH (Remove and Replace)
Remove
Remove the LH front wheel arch liner. See
Wheel Arch Liner - Front - LH (Remove and Replace).
Remove the front aero shield panel. See
Panel - Aero Shield - Front (Remove and Replace).
Link - Lateral - Lower - Front - LH (Remove and Replace)
Remove
Raise and support the vehicle. See
Raise Vehicle - 2 Post Lift.
Remove the LH front wheel. See
Wheel (Remove and Install).
Remove and discard the nut that attaches the LH front lowe
SEE MORE:
Controls
Overview
Touch Controls on the bottom
corner of the touchscreen to control features and
customize Model 3 to suit your preferences. The Controls window appears over the
map. Touch an option on the left side of the window to display the associated
controls and settings. By default, Quick Contro
Maintaining Tire Pressures
Keep tires inflated to the pressures shown on
the Tire and Loading Information label, even if
it differs from the pressure printed on the tire
itself. The Tire and Loading Information label is
located on the center door pillar and is visible
when the front door is open.
Note: If your Model 3 i
© 2019-2025 Copyright www.tmodel3.com
