Tesla Model 3: HVAC Assembly- Install
Tesla Model 3 2017-2025 Service Manual / Thermal Management / Cabin HVAC / HVAC Assembly (Remove and Replace) / HVAC Assembly- Install
Install
- With an assistant, position the HVAC assembly into the vehicle.
Note: Align the drain hose and TXV housing.
- Install the bolt that attaches the lower LH side HVAC assembly to the
vehicle.
.png) Torque
5.5 Nm
Torque
5.5 Nm - Push the PTC heater harness through the bulkhead, and then install the grommet.
Note: Use caution not to damage the HV cable while passing the cable through the bulkhead.

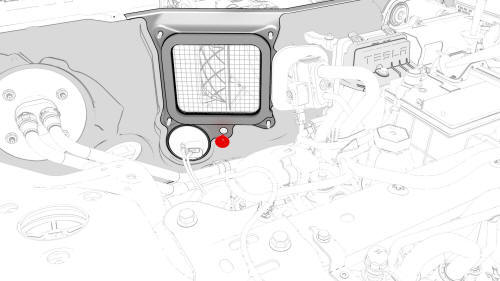
- Install the bolt that attaches the HVAC module to the body near the HVAC
inlet.
.png) Torque
5.5 Nm
Torque
5.5 Nm - Install the TXV valve. See TXV Valve - Evaporator (Remove and Replace).
- Perform the A/C refrigerant recharge. See A/C Refrigerant (Recovery and Recharge).

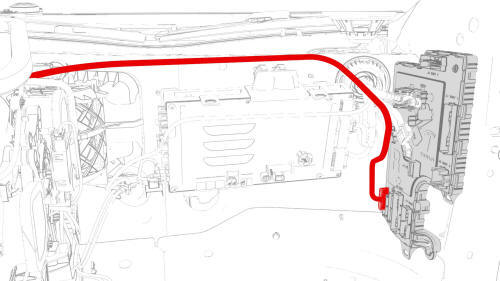
- Connect the HVAC harness connector from the RH body controller.

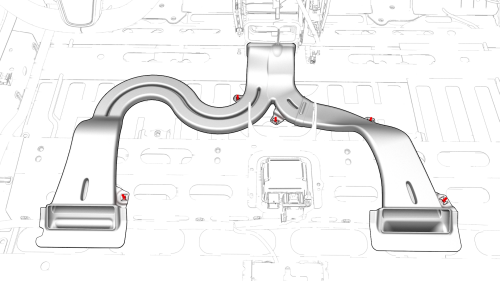
- Release the clips that attach the RH and LH floor ducting to the floor, and remove the ducting.
- Install the cross car beam. See Beam - Cross Car (Remove and Replace).
- Install the RH front carpet. See Carpet - Front - RH (Remove and Replace).
- Install the LH front carpet. See Carpet - Front - LH (Remove and Replace).
- Install the LH air wave duct. See Duct - Air Wave - LH (Remove and Replace).
- Install the IP carrier. See IP Carrier (Remove and Install).
- Install the front passenger airbag. See Airbag - Front Passenger (Remove and Install).
- Install the LH, center, and RH dash speakers. See Speaker - Dash - LH (Remove and Replace).
- Install the RH air wave duct. See Duct - Air Wave - RH (Remove and Replace).
- Install the RH front vent. See Vent - Front - RH (Remove and Replace).
- Install the RH footwell duct. See Duct - Footwell - LH (Remove and Replace).
- Install the LH front vent. See Vent - Front - LH (Remove and Replace).
- Install the touchscreen. See Touchscreen (Remove and Replace).
- Remove the steering column control module. See Module - Steering Column Control (Remove and Replace).
- Install the steering wheel. See Steering Wheel (Remove and Install).
- Install the driver air bag. See Airbag - Driver (Remove and Replace).
- Install the RH air wave duct. See Duct - Air Wave - RH (Remove and Replace).
- Install the RH footwell duct. See Duct - Footwell - LH (Remove and Replace).
- Install the glove box. See Glove Box (LHD) (Remove and Replace).
- Install the main instrument panel decor trim. See Decor Trim - Instrument Panel - Main (Remove and Replace).
- Install the LH and RH air wave end cap. See End Cap - Air Wave - LH (Remove and Replace).
- Install the front passenger knee airbag. See Airbag - Knee - Front Passenger (Remove and Replace).
- Install the center console. See Center Console (Remove and Install).
- Install the LH footwell duct. See Duct - Footwell - LH (Remove and Replace).
- Install the driver knee airbag. See Airbag - Knee - Driver (Remove and Install).
- Install the driver seat. See Seat - Driver (Remove and Replace).
- Install the windshield washer reservoir. See Reservoir - Windshield Washer (Remove and Replace).
- Perform the platter enclosure air leak test. See Platter Enclosure Air Leak Test.
- Install the clips that attach the PTC heater electrical connector to the
body.
.jpg)
.jpg)
- Install the HV harness connector to the PTC heater.
- Install the front aero shield panel. See Panel - Aero Shield - Front (Remove and Replace).
- Install the LH front wheel arch liner. See Wheel Arch Liner - Front - LH (Remove and Replace).
- Install the front aero shield panel. See Panel - Aero Shield - Front (Remove and Replace).
- Install the LH front wheel. See Wheel (Remove and Install).
- Reconnect 12V power. See 12V Power (Disconnect and Connect).
- Use a laptop to update vehicle firmware
- Install the front passenger seat. See Seat - Driver (Remove and Replace).
- Install the driver and front passenger footwell cover. See Cover - Footwell - Driver (Remove and Replace).
- Install the LH and RH upper A-pillar trim. See Trim - A-Pillar - Upper - LH (Remove and Replace).
- Install the LH and RH lower A-pillar trim. See Trim - A-Pillar - Lower - LH (Remove and Replace).
- Install the LH and RH middle A-pillar trim. See Trim - A-Pillar - Middle - LH (Remove and Replace).
- Install the LH and RH instrument panel end caps. See End Cap - Instrument Panel - LH (Remove and Replace).
- Install the 2nd row lower seat cushion. See Seat Cushion - Lower - 2nd Row (Remove and Replace).
- Install the inner HVAC plenum duct. See Duct - HVAC Plenum - Inner (Remove and Replace).
- Install the outer HVAC plenum duct. See Duct - HVAC Plenum - Outer (Remove and Replace).
- Install the wiper motor. See Wiper Motor (Remove and Replace).
- Install the cowl screen panel. See Panel - Cowl Screen (Remove and Replace).
- Install the LH and RH shock tower covers. See Cover - Shock Tower - LH (Remove and Replace).
- Remove the A/C lines from the vehicle.
- Inject oil into the A/C system.
- Install the caps onto the A/C ports.
- Test the A/C function and make sure that the HVAC blows cold air.
- Install the underhood storage unit. See Underhood Storage Unit (Remove and Replace).
- Install the hood latch cover. See Cover - Hood Latch (Remove and Replace).
- Install the cabin intake duct. See Duct - Cabin Intake (Remove and Replace).
- Install the LH and RH wiper arms. See Wiper Arms (Remove and Replace).
- Install the rear underhood apron. See Underhood Apron - Rear (Remove and Replace).
READ NEXT:
 Blower Motor - HVAC (Remove and Replace)
Remove
Remove the HVAC assembly. See
HVAC Assembly (Remove and Replace).
Remove the screws that attach the HVAC fan motor to the HVAC assembly,
and then remove the motor from the HVAC asse
 Sensor - Ambient Air Temperature (Remove and Replace)
Remove
Remove the front fascia. See
Fascia - Front (Remove and Install).
Disconnect the electrical harness from the ambient air temperature
sensor connector.
Release the clip that attac
 Sensor - Cabin Temperature (Remove and Replace)
Note: This procedure was formulated using a release candidate
or production model. Follow safety requirements and use extreme caution when
working on or near high-voltage systems and compone
SEE MORE:
 Autopilot
This is a thorough rundown of the Autopilot Advanced Driver Assistance System (ADAS). It discusses autopilot's features and constraints while highlighting how it improves driving safety and comfort.
This section gives a summary of the functioning of several Autopilot features, including Traffic-Awa
 Applique - B-Pillar - LH (Remove and Replace) -
Remove
Remove
Open the LH front and rear doors.
Release the clips that attach the B-pillar applique fastener cover to
the vehicle, and then remove the cover.
Remove the bolts that attach the B-pillar applique to the body, but do
not remove the applique from the vehicle at this time.
© 2019-2025 Copyright www.tmodel3.com

