Tesla Model 3: Fuse - A/C Compressor - HV Battery- Remove
Tesla Model 3 2017-2025 Service Manual / Battery System / HV Battery Electrical Components / Fuse - A/C Compressor - HV Battery (Remove and Replace) / Fuse - A/C Compressor - HV Battery- Remove

SPECIAL TOOLS
Ratchet, 1/4" Sq Dr, HV Insulated (1057602-00-A)
Ext Bar, Wobble, 1/4" Dr, HV Insulated (1057603-00-A)
Skt, 1/4" Sq Dr, 8mm, HV Insulated (1057604-00-A)
Magnet, Flexible, HV Insulated, 18" (1057607-00-A)
Asy, Service Cover, Penthouse, Model 3 (1127845-00-A)
Warning:
Only technicians who have been trained in High Voltage Awareness are permitted to perform this procedure. Proper personal protective equipment (PPE) and insulating HV gloves with a minimum rating of class 0 (1000V) must be worn at all times a high voltage cable, busbar, or fitting is handled. Refer to Tech Note TN-15-92-003, "High Voltage Awareness Care Points" for additional safety information.
Remove
- Remove the pyrotechnic battery disconnect from the penthouse. See Pyrotechnic Battery Disconnect (Remove and Replace).
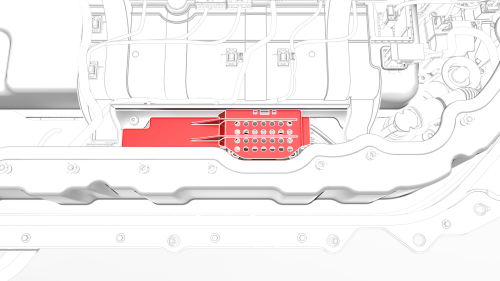
- Raise the high voltage controller, release the clips that attach the fuse access insulator to the RH penthouse bus cover, and remove the insulator.

- Remove and discard the nuts that attach the A/C compressor fuse to the
RH penthouse bus and remove the fuse.

READ NEXT:
 Fuse - A/C Compressor - HV Battery- Install
Install
Install the A/C compressor fuse to the RH penthouse bus, and then
install new nuts to attach the fuse to the bus.
Torque 2.5 Nm
Generic Measurement - Actual busbars and fasteners mi
Fuse - Cabin Heater - HV Battery- Remove
SPECIAL TOOLS
Ratchet, 1/4" Sq Dr, HV Insulated (1057602-00-A)
Ext Bar, Wobble, 1/4" Dr, HV Insulated (1057603-00-A)
Skt, 1/4" Sq Dr, 8mm, HV Insulated (1057604-00-A)
Magnet, Flexible, HV Insulated,
SEE MORE:
Trim - A-Pillar - Middle - LH (Remove and Replace)
Remove
Remove the LH instrument panel end cap. See
End Cap - Instrument Panel - LH (Remove and Replace).
Release the upper clip that attaches the LH middle A-Pillar trim, and
then pull out the trim to remove it from the vehicle.
Note: Remove any remaining LH middle A-pillar trim clip
Windshield (Remove and Install)-Remove
Remove
Open all doors and lower all windows.
Open the hood.
Remove the rear underhood apron. See Underhood Apron - Rear (Remove and
Replace).
Remove the cabin intake duct. See Duct - Cabin Intake (Remove and
Replace).
Remove the hood latch cover. See Cover - Hood Latch (Remove and
Rep
© 2019-2025 Copyright www.tmodel3.com
