Tesla Model 3: ECU - Headlight - Install
Tesla Model 3 2017-2025 Service Manual / Electrical / Exterior Lights / ECU - Headlight (Remove and Replace) / ECU - Headlight - Install
Install
- Connect the LH headlight ECU connector, and then position the ECU onto the headlight.
Note: Position the seal to the headlight ECU, if necessary.
Note: Align the electrical connector to the headlight ECU, and then close the locking tab while pushing the connector into the headlight ECU.
Note: Make sure that the electrical connector and locking tab are fully seated.
Note: Press the headlight ECU downward, and then turn it to align the fastener holes and anti-rotating guides.
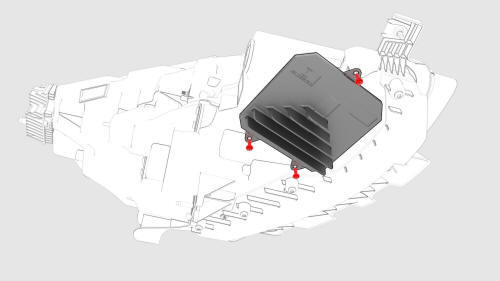
- Install the screws that attach the headlight ECU to the LH headlight
assembly.
.png) Torque
2.5 Nm
Torque
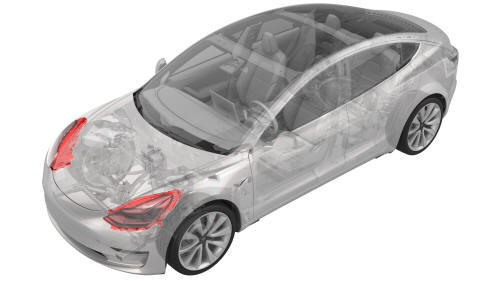
2.5 Nm - Install the LH headlight assembly. See Headlight - LH (Remove and Replace).
- Install the front fascia. See Fascia - Front (Remove and Install).
- Install the LH front wheel and the RH front wheel. See Wheel (Remove and Install).
- Install the underhood storage unit. See Underhood Storage Unit (Remove and Replace).
- Install the hood latch cover. See Cover - Hood Latch (Remove and Replace).
- Install the cabin intake duct. See Duct - Cabin Intake (Remove and Replace).
- Install the rear underhood apron. See Underhood Apron - Rear (Remove and Replace).
- If a new headlight ECU has been installed, update the vehicle firmware. Otherwise, skip to the next step.
- Adjust the headlights. See Headlights - Adjust - NA (Wall Method).
Headlights - Adjust - EMEA (Tool Method)
Adjust Headlights Using a Headlight Tester
This procedure is under development and will be available soon.
READ NEXT:
 Headlights - Adjust - EMEA (Wall Method)
Adjust Headlights Using a Wall
Apply Tape to Wall
Apply tape to a wall 23.6 in (60 cm) from the ground.
Apply tape to the floor 31.1 ft (9.5 m) from the wall.
Note: EU vehicles require a 1 to
Headlights - Adjust - NA (Tool Method)
Adjust Headlights Using a Headlight Tester
Park the vehicle on a level surface.
Make sure that all 4 tires are inflated to specification.
Open the front trunk hood.
On the touchscreen, enter h
Headlights - Adjust - NA (Wall Method)
Adjust Headlights Using a Wall
Position the vehicle for adjusting the headlights. The vehicle should be:
Located in a darkened area.
Parked on a level surface.
Perpendicular to a wall that ha
SEE MORE:
Pretensioners
Pretensioner - Outboard Lap - 1st Row - LH (Remove and Replace)
Note: This procedure was formulated using a release candidate or
production model. Follow safety requirements and use extreme caution when
working on or near high-voltage systems and components
Remove
Remove the 2nd row lower seat
Sensor - Rear Motor - Speed (Remove and Replace)
Special tool required for this procedure:
1451839-00-A SKT, EP10 LOW PROFILE
1115031-00-A EXT, WOBBLE, 1/4" DR, 1.25"
Remove
Drain the oil from the rear drive unit. See Gearbox
Flu
© 2019-2025 Copyright www.tmodel3.com
