Tesla Model 3: Procedure

Special tools required for this procedure:
SPECIAL TOOLS
Pliers, Clip Removal (1133569-00-A)
- On a wall, measure 14.5 in (36.8 cm) from the floor, and then apply a length of 1-inch masking tape horizontally to the wall to mark the measurement.
- Measure 25 ft (7.62 m) from the wall, and then apply a short length of 1-inch masking tape to the floor to mark the measurement.
- Position the vehicle perpendicular to the wall, aligning the vehicle front facia with the masking tape on the floor.
- Make sure that all 4 tires are inflated to their recommended settings. See Tire Pressures.
Note: Do not sit in the vehicle, as this will affect fog light height.
- Ensure that the vehicle is powered up and that the exterior lights are set to "On" or "Auto" by touching the vehicle center display: Controls > Quick Controls > Exterior Lights.
- Turn on the fog lights by touching the vehicle center display: Controls > Quick Controls > Fog Lamp.
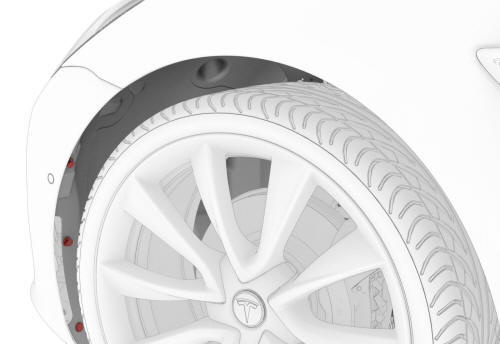
- Release the push clips (x3) that attach the LH front wheel arch liner to the vehicle.
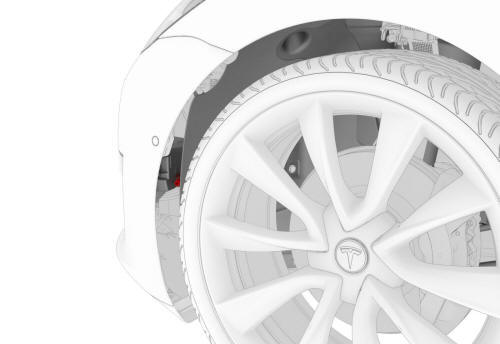
- Open the wheel liner to access the LH fog light adjuster.
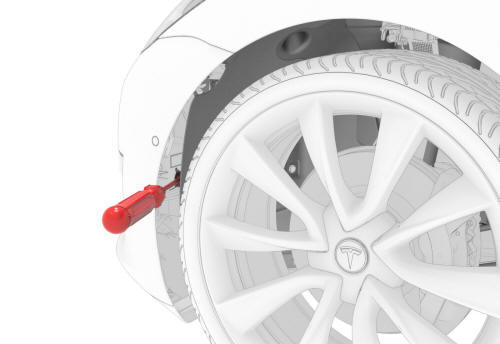
- Insert a #2 Phillips head (100 mm/4 in) screwdriver into the adjuster, and adjust the fog light vertically to specification.
Wall target: max -3.0" @ 25 ft, min - 4.5 " @ 25ft, ECE and SAE target: max - 0.60 deg, min - 0.85 deg.
- Repeat steps 7-8 on the RH fog light.
- Reinstall the push clips (x3) that hold the LH and RH front wheel liners to the fascia.
- Use the vehicle center display to turn off the fog lights: Controls > Quick Controls > Fog Lamp.
READ NEXT:
 Adjust Fog Lights Using a Headlight Tester
Special tools required for this procedure:
SPECIAL TOOLS
Pliers, Clip Removal (1133569-00-A)
Headlight Tester, Beissbarth, Model 815 (1133367-00-A)
Fog lights can be tested and adjusted during the hea
Light - Fog / Reverse - Rear - LH (Remove and Replace)
Remove
Remove the trunk lid trim. See Trim - Lid - Trunk (Remove and Replace).
Disconnect the electrical wiring harness connector from the LH rear fog/reverse
light.
Remove the nut tha
Light - License Plate (Remove and Replace)
Remove
Remove the trunk lid trim. See Trim - Lid - Trunk (Remove and Replace).
Disconnect the electrical connector from the license plate light.
Push the license plate light towards the
SEE MORE:
Online Routing
Model 3 detects real-time traffic conditions
and automatically adjusts the estimated
driving and arrival times based on traffic. In
situations where traffic conditions will delay
your estimated time of arrival and an alternate
route is available, the navigation system can
reroute you to your d
Headlight - LH- Remove
It is recommended that the vehicle be powered down before executing headlight
replacement to ensure that the new headlights are recognized during vehicle
firmware update.
Remove
Raise and support the vehicle. See Raise Vehicle - 2 Post Lift.
Remove the rear underhood apron. See Underhood Apro
© 2019-2025 Copyright www.tmodel3.com
