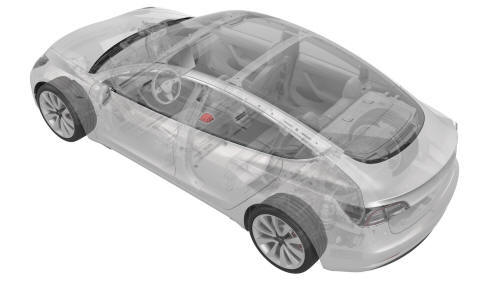
Tesla Model 3: Module - Restraint Control (Remove and Replace)
Tesla Model 3 2017-2025 Service Manual / Safety and Restraint / Airbags / Module - Restraint Control (Remove and Replace)
Note:
This procedure was formulated using a release candidate or production model. Follow safety requirements and use extreme caution when working on or near high-voltage systems and components.
Remove
- Remove the LH and RH center console side panel carpets. See Carpet - Side Panel - Center Console - LH (Remove and Replace).
- Remove the center console. See Center Console (Remove and Install).
- Remove the rear underhood apron. See Underhood Apron - Rear (Remove and Replace).
- Disconnect 12V power. See 12V Power (Disconnect and Connect).
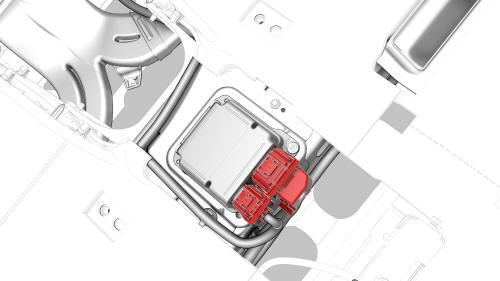
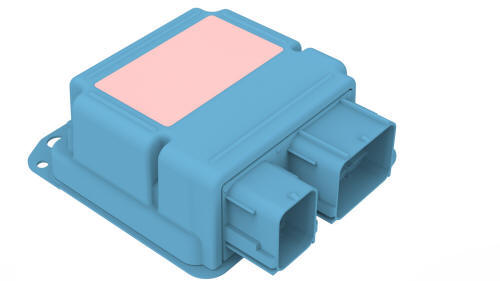
- Disconnect the electrical connectors from the restraint control module.
- Remove and discard the nuts that attach the restrain control module to
the body, and then remove the restraint control module from the vehicle.
Install
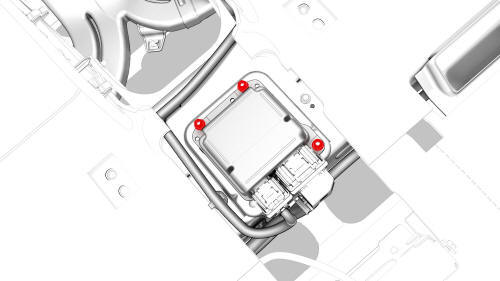
- Install new nuts that attach the restraint control module to the body.
 Torque 8 Nm
- Connect the electrical connectors to the restraint control module.
- Connect 12V power. See 12V Power (Disconnect and Connect).
- Install the rear underhood apron. See Underhood Apron - Rear (Remove and Replace).
- Install the center console. See Center Console (Remove and Install).
- Install the LH and RH center console side panel carpets. See Carpet - Side Panel - Center Console - LH (Remove and Replace).
- Use Garage to update the vehicle firmware.
- Connect a laptop with Toolbox to the vehicle.
- In Toolbox, type "PING" in the search field.
Note: Make sure "Actions" is selected, if not already.
- Click on "PING-TP_ RCM", and then select Run.
- In Toolbox, type "RCM" in the search field.
- Click on "TEST-SELF_ RCM_X_CHASSIS-CAN", and then select Run.
- Click on "TEST-SELF_ RCM_X_PRIVATE-CAN", and then select Run.
- In Toolbox, type "PROC_RCM" in the search field.
- Click on "PROC_RCM_DRV_LEARN-ORIENTATION", and then select Run.
- In Toolbox, type "TEST_RCM" in the search field.
- Click on "TEST_RCM_DRV_CONFIRM-ORIENTATION", and then select Run.
- In Toolbox, type "TEST-SELF_RCM" in the search field.
- Click on "TEST-SELF_RCM_X_MAIN-POWER", and then select Run.
- Click on "TEST-SELF_RCM_X_REDUNDANT-POWER", and then select Run.
- In Toolbox, type "TEST_RCM" in the search field.
- Click on "TEST_RCM_X_REDUNDANT-POWER-VERIFY", and then select Run.
- In Toolbox, type "TEST-SAT" in the search field.
- Click on "TEST-SAT_ RCM_L_B-PILLAR-IMPACT-SENSOR", and then select Run.
- Click on "TEST-SAT_ RCM_R_C-PILLAR-IMPACT-SENSOR", and then select Run.
- In Toolbox, type "TEST-PYRO" in the search field.
- Click on "TEST-PYRO_RCM_R1-L_CURTAIN-AIRBAG", and then select Run.
- Click on "TEST-PYRO_RCM_R1-R_CURTAIN-AIRBAG", and then select Run.
- Click on "TEST-PYRO_RCM_DRV_KNEE-AIRBAG", and then select Run.
- Click on "TEST-PYRO_RCM_PAS_AIRBAG-STAGE-1", and then select Run.
- Click on "TEST-PYRO_RCM_PAS_AIRBAG-STAGE-2", and then select Run.
- Click on "TEST-PYRO_RCM_PAS_AIRBAG-ACTIVE-VENT", and then select Run.
- Click on "TEST-PYRO_RCM_PAS_KNEE-AIRBAG", and then select Run.
- Click on "TEST-PYRO_RCM_R2-L_PRETENSIONER", and then select Run.
- Click on "TEST-PYRO_RCM_R2-R_PRETENSIONER", and then select Run.
- Click on "TEST-PYRO_RCM_DRV_RETRACTOR-PRETENSIONER", and then select Run.
- Click on "TEST-PYRO_RCM_DRV_SEATBELT-LOAD-LIMITER", and then select Run.
- Click on "TEST-PYRO_RCM_PAS_RETRACTOR-PRETENSIONER", and then select Run.
- Click on "TEST-PYRO_RCM_PAS_SEATBELT-LOAD-LIMITER", and then select Run.
- In Toolbox, type "TEST_RCM" in the search field.
- Click on "TEST_RCM_X_ALR-RETRACTOR-SWITCH", and then select Run.
- In Toolbox, type "TEST-SAT" in the search field.
- Click on "TEST-SAT_ RCM_FRONT-L_IMPACT-SENSOR", and then select Run.
- Click on "TEST-SAT_ RCM_FRONT-C_IMPACT-SENSOR", and then select Run.
- Click on "TEST-SAT_ RCM_FRONT-R_IMPACT-SENSOR", and then select Run.
- Click on "TEST-SAT_ RCM_R_B-PILLAR-IMPACT-SENSOR", and then select Run.
- In Toolbox, type "HVC" in the search field.
- Click on "TEST_RCM_X_ENS-TO-HVC", and then select Run
- In Toolbox, type "PROC_RCM" in the search field.
- Click on "PROC_RCM_IMU-CALIBRATION", and then select Run
- In Toolbox, type "TEST_RCM" in the search field.
- Click on "TEST_RCM_L_SEAT-TRACK-SENSOR", and then select Run.
- Click on "TEST_RCM_R_SEAT-TRACK-SENSOR", and then select Run.
- In Toolbox, type "TEST_PYRO" in the search field.
- Click on "TEST-PYRO_RCM_R1-L_SIDE-AIRBAG", and then select Run.
- Click on "TEST-PYRO_RCM_R1-R_SIDE-AIRBAG", and then select Run.
- Click on "TEST-PYRO_RCM_DRV_LAP-PRETENSIONER", and then select Run.
- Click on "TEST-PYRO_RCM_PAS_LAP-PRETENSIONER", and then select Run.
- Click on "TEST-PYRO_RCM_X_DAB-STAGE-1", and then select Run.
- Click on "TEST-PYRO_RCM_X_DAB-STAGE-2", and then select Run.
- Click on "TEST-PYRO_RCM_DRV_ACTIVE-VENT", and then select Run.
- In Toolbox, type "TEST_SAT" in the search field.
- Click on "TEST-SAT_ RCM_FRONT-L_DOOR-PRESSURE", and then select Run.
- Click on "TEST-SAT_ RCM_FRONT-R_DOOR-PRESSURE", and then select Run.
- In Toolbox, type "TEST_SN" in the search field.
- Click on "TEST-SN_ RCM_L_B-PILLAR-IMPACT-SENSOR", and then select Run.
- Click on "TEST-SN_ RCM_R_B-PILLAR-IMPACT-SENSOR", and then select Run.
- Click on "TEST-SN_ RCM_L_C-PILLAR-IMPACT-SENSOR", and then select Run.
- Click on "TEST-SN_ RCM_R_C-PILLAR-IMPACT-SENSOR", and then select Run.
- Click on "TEST-SN_ RCM", and then select Run.
- Click on "TEST-SN_ RCM_FRONT-L_IMPACT-SENSOR", and then select Run.
- Click on "TEST-SN_ RCM_FRONT-C_IMPACT-SENSOR", and then select Run
- Click on "TEST-SN_ RCM_FRONT-R_IMPACT-SENSOR", and then select Run.
- Click on "TEST-SN_ RCM_FRONT-L_DOOR-PRESSURE", and then select Run.
- Click on "TEST-SN_ RCM_FRONT-R_DOOR-PRESSURE", and then select Run.
- In Toolbox, type "PROC_RCM" in the search field.
- Click on "PROC_RCM_X_LEARN-VIN", and then select Run.
- In Toolbox, type "TEST_RCM" in the search field
- Click on "TEST_RCM_X_CONFIRM-VIN", and then select Run.
- In Toolbox, type "TEST-DTC" in the search field.
- Click on "TEST-DTC_ RCM", and then select Run.
- In Toolbox, type "PROC_RCM" in the search field.
- Click on "PROC_RCM_ARM", and then select Run.
- Click on "PROC_RCM_X_DISABLE-DIAGNOSTICS", and then select Run.
READ NEXT:
 Buckle - 1st Row - LH (Remove and Replace)
Remove
Open all four doors, lower all four windows, and then move both front
seats forward.
Remove the 2nd row lower seat cushion. See Seat Cushion - Lower - 2nd
Row (Remove and Replace).
Re
Buckle - 2nd Row - Center (Remove and Replace)
Note:
This procedure was formulated using a release candidate or production
model. Follow safety requirements and use extreme caution when working on or
near high-voltage systems and components.
SP
SEE MORE:
Seal - Oil - Differential to
Halfshaft - Rear Drive Unit - LH
(Remove and Replace)
SPECIAL TOOLS
Adapter, Coolant Reservoir Pressure Test (1130942-00-B)
Install Tool, Output Seal, Model 3 (1131206-00-A)
Remove
Remove the LH rear drive unit halfshaft. See
Halfshaft - Rear Drive Unit - LH (Remove and Replace).
Use the special tool to remove the LH output seal from the re
Rear Cameras
Camera - Rear Facing (Remove and Replace)
Remove
Remove the trunk trim. See Trim - Lid - Trunk (Remove and Replace).
Remove the trunk exterior release switch. See Switch - Exterior Release
- Trunk (Remove and Replace)
Install
Install the trunk exterior release switch. See Switch - Exterior
© 2019-2025 Copyright www.tmodel3.com
