Tesla Model 3: Module - Body Controller - Security- Remove
Tesla Model 3 2017-2025 Service Manual / Electrical / Keyless Entry and Security / Module - Body Controller - Security (Remove and Replace) / Module - Body Controller - Security- Remove

Remove
- Open all doors and lower all windows
- Remove the 2nd row lower seat cushion. See Seat Cushion - Lower - 2nd Row (Remove and Replace).
- Move the driver seat and front passenger seat fully rearward.
- Disconnect 12V power. See 12V Power (Disconnect and Connect).
- Open the armrest.
- Remove the LH and RH center console decor trims. See Decor Trim - Center Console (Remove and Replace).
.png) <>
<>
LH shown, RH similar
- Remove the screws and release the tabs that attach the LH bright strip to the center console, and then remove the strip from the console. Repeat this step to remove the RH bright strip.
.jpg)
- Release the clips (x6) that attach the cup holder decor panel to the cup holder assembly, and then separate the cup holder decor panel from the center console assembly.
.jpg)
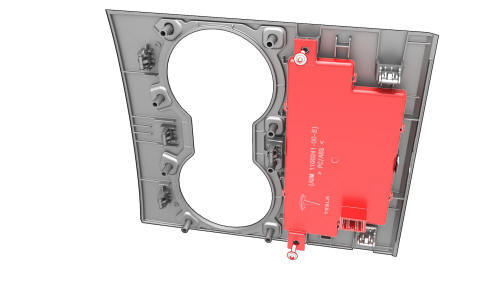
- Disconnect the electrical connector from the security body controller module, and then remove the cup holder decor panel from the vehicle.

- Remove the screws that attach the security body controller module to the
cup holder decor panel, and then remove the security body controller module
from the panel.

READ NEXT:
 Module - Body Controller - Security- Install
Install
Install the screws (x2) that attach the security body controller module
to the cup holder decor panel.
Torque 1.6 Nm
Connect the electrical connector to the security body controll
 Siren - Battery Backed (Remove and Replace)
Remove
Remove the front fascia assembly. See
Fascia - Front (Remove and Install).
Disconnect the connector from the battery backed siren.
Remove the bolt that attaches the battery backe
SEE MORE:
 Damper - Rear - LH (Coil Suspension) (Remove and Replace)
Remove
Raise and support the vehicle on a 2 post lift. See
Raise Vehicle - 2 Post Lift.
Remove the LH rear wheel. See Wheel (Remove and
Install).
 Harness - Trunk- Remove
Remove
Remove the package tray trim. See Trim - Package Tray (Remove and
Install).
Disconnect the trunk electrical harness connectors.
Remove and discard the bolt that attaches the ground strap to the body.
Push the trunk electrical wiring harness through the bulkhead.
Remove t
© 2019-2025 Copyright www.tmodel3.com

