Tesla Model 3: Instructions for Transporters
DO NOT TRANSPORT WITH WHEELS ON THE GROUND
The rear motor in Model 3 generates power when the wheels spin. Always transport Model 3 with all four tires off the ground. Ensure that the tires are unable to spin at any time during transport.
Warning: NEVER TRANSPORT YOUR VEHICLE WITH THE TIRES IN A POSITION WHERE THEY CAN SPIN.
DOING SO CAN LEAD TO SIGNIFICANT DAMAGE AND OVERHEATING. IN RARE CASES EXTREME OVERHEATING MAY CAUSE THE SURROUNDING COMPONENTS TO IGNITE.

Do not transport Model 3 using any method that is not specified by Tesla. Adhere to the instructions provided in the following sections and observe all warnings and cautions provided. Damage caused by improper transporting of your vehicle is not covered by the warranty.
Note: Tesla is not liable or responsible for reimbursing services not dispatched through Tesla Roadside Assistance.
Approved Methods for Transporting
Note: The tires are allowed to rotate slowly (under 3 mph or 5 km/h) and for a very short distance (less than 30 feet or 10 meters) only when Transport Mode is enabled while the vehicle is being winched onto a flatbed truck or pulled out of a parking space for repositioning. Exceeding these boundaries can lead to significant damage and overheating that is not covered by the warranty.
A flatbed truck or comparable transport vehicle is the recommended method of transporting Model 3. The vehicle can face either direction when using a flatbed.

If Model 3 must be transported without a flatbed truck, then wheel lifts and dollies must be used to ensure that all four wheels are off of the ground. This method may only be used for a maximum of 35 miles (55 km), and must not exceed the manufacturer speed rating of the dollies. With this method, Tesla recommends the vehicle facing forward so that the front wheels are lifted and the rear wheels are on dollies.

Caution: Enable Transport Mode (see Activate Transport Mode) before winching Model 3 onto a flatbed truck (see Pull onto the Flatbed Truck). If Transport Mode is not available or the touchscreen is not accessible, self-loading dollies or tire skates must be used to load the vehicle into the approved transportation position. Tesla is not responsible for any damage caused by or during the transport of Model 3, including personal property damage or damage caused by using self-loading dollies or tire skates.
Warning: Model 3 is equipped with high voltage components that may be compromised as a result of a collision. Before transporting Model 3, it is important to assume these components are energized. Always follow high voltage safety precautions (wearing personal protection equipment, etc.) until emergency response professionals have evaluated the vehicle and can accurately confirm that all high voltage systems are no longer energized. Failure to do so may result in serious injury.
Activate Transport Mode
Transport Mode keeps the parking brake disengaged while winching Model 3 onto a flatbed truck. When active, Transport Mode displays a message indicating that the vehicle will remain free-rolling. The following are required to enable Transport Mode:
- 12V power is required. You are unable to use the touchscreen to activate Transport Mode if Model 3 has no power.
- Model 3 must detect a key. Transport Mode is available only when a key is detected.
To activate Transport Mode:
- Ensure the vehicle is in Park.
- Chock the tires or otherwise ensure Model 3 is secure.
- Press and hold the brake pedal, then on the touchscreen, touch Controls > Service > Towing. The touchscreen displays a message reminding you how to properly transport Model 3.
- Press and hold the Transport Mode button until it turns blue. Model 3 is now freerolling and can slowly be rolled (no faster than walking speed) or winched.
To cancel Transport Mode, shift Model 3 into Park.
Note: If Model 3 loses 12V power after Transport Mode is enabled, Transport Mode will cancel and the parking brake will be reapplied.
Caution: If the electrical system is not working, and you therefore cannot use the touchscreen to activate Transport Mode, use self-loading dollies or tire skates. Before doing so, always check the manufacturer's specifications and recommended loading capacity.
Pull onto the Flatbed Truck
Note: If Model 3 has no 12V power, you need an external 12V power supply to open the hood or use the touchscreen
Caution: To avoid damage, only pull the vehicle onto a flatbed truck using a properly-installed tow eye. Using the chassis, frame, or suspension components to pull the vehicle can result in damage.
- Locate the tow eye. The tow eye is located under the carpet in the front trunk.
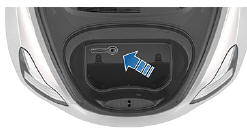
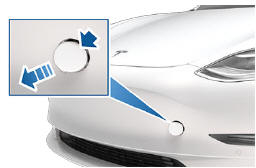
- Release the tow eye cover by pressing firmly on its top right perimeter until it pivots inward, then gently pulling the raised section toward you.
Note: The tow eye cover is connected to the vehicle's black negative (-) terminal.
- Fully insert the tow eye into the opening, then turn it counter-clockwise until securely fastened.
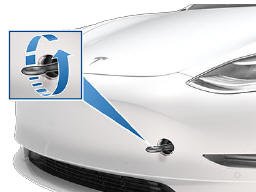
- Attach the winch cable to the tow eye.
Caution: Before pulling, make sure the tow eye is securely tightened.
- Activate Transport Mode.
- Pull Model 3 slowly onto the flatbed truck.
Secure the Tires
The vehicle's tires must be secured onto the truck using the eight-point tie-down method.
- Ensure any metal parts on the tie-down straps do not contact painted surfaces or the face of the wheels.
- Do not place tie-down straps over body panels or through the wheels.
Caution: Attaching the tie-down straps to the chassis, suspension or other parts of the vehicle's body may cause damage.

If Vehicle Has No Power
If Model 3 has no 12V power, perform the following steps to open the hood or jump start the auxiliary 12V battery.
Jump Starting the 12V Battery
Caution: Model 3 cannot be used to jump start another vehicle. Doing so can result in damage.
Note: If jump starting Model 3 using another vehicle, refer to that vehicle manufacturer's instructions. The following instructions assume an external 12V power supply (such as a portable jump starter) is used.
Caution: Avoid short circuits when jump starting Model 3. Connecting cables to the wrong terminals, touching leads together, etc., can result in damage to Model 3.
- Open the hood
- Remove the maintenance panel by pulling it upwards to release the trim clips that hold it in place.

- Remove the cabin intake trim panel by pulling it upwards to release the trim clips that hold it in place.

- Connect the 12V power supply's red positive (+) cable to the red positive (+) terminal on the 12V battery.
Caution: To avoid damaging Model 3, do not allow the positive cable to contact other metal components, such as the battery tie-down bracket.
- Connect the 12V power supply's black negative (-) cable to the black negative (-) terminal on the 12V battery.

- Turn on the external power supply (refer to the manufacturer's instructions). Touch the touchscreen to wake it up.
Note: It may take several minutes to receive enough power to wake up the touchscreen.
- When external 12V power is no longer required, disconnect both cables from the terminals on the 12V battery, beginning with the black negative (-) cable.
- Replace the cabin intake trim panel by placing it back in its original location and pressing down until it is secure.
- Replace the maintenance panel by placing it back in its original location and pressing down until it is secure.
- Close the hood.
READ NEXT:
SEE MORE:
 Halfshaft - Front Drive Unit - LH (Remove and Replace)
Halfshaft - Front Drive Unit - LH - Remove
SPECIAL TOOLS
Tool, Axle Extraction, Model 3 (1133386-00-A)
Tool, Hub Puller, Hydraulic (1096075-00-A)
Link - Compliance - Lower - Front - LH (Remove and Replace)
Remove
Remove the LH front wheel arch liner. See
Wheel Arch Liner - Front - LH (Remove and Replace).
Remove the front aero shield panel. See
Panel - Aero Shield - Front (Remove and Replace).
Remove and discard the nut that attaches the front LH lower compliance
link to the knuckle.
