Tesla Model 3: Flood Ports - 2nd Generation (Remove and Replace) - Install
Tesla Model 3 2017-2025 Service Manual / Battery System / HV Battery Enclosure / Flood Ports - 2nd Generation (Remove and Replace) / Flood Ports - 2nd Generation (Remove and Replace) - Install
Install
- Use an IPA wipe to clean the area around the openings where the flood ports were removed.
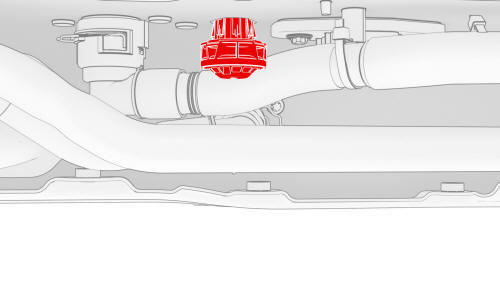
- Install a 2nd generation flood port into the opening at the LH underside of the HV battery penthouse.
Note: Press up firmly to fully seat the flood port and fasten the clips (x8) internally.
- Repeat step 2 to install a 2nd generation flood port into the RH underside of the HV battery penthouse.
.png)
- Fasten the clips that attach the HV battery coolant hoses to the RH shear plate.
.png)
- Fasten the clips that attach the HV battery coolant hoses to the LH shear plate.
- Check that the HV connections at the rear of the HV battery are tight and secure.
- Install the rear HV battery skid plate. See Skid Plate - HV Battery - Rear (Remove and Replace).
- Perform a penthouse air leak test. See Penthouse Air Leak Test.
READ NEXT:
 Flood Ports - 2nd Generation (Retrofit)
Procedure
Note: This procedure destructively removes the 1st generation flood
ports and installs 2nd generation flood ports.
Connect a laptop with Toolbox 3 to the vehicle.
In Toolbox, click in
Gasket - Cover - HV Battery (Remove and Replace)
Remove
Note: There are two types of HV battery cover gaskets: an older
platter perimeter gasket, and a newer penthouse perimeter gasket. These are
referred to as platter type and penthouse type. Thi
HV Battery Air Leak Test
Pack Enclosure Leak Tester, HV Battery (1026636-00-A)
Pack Kit, Enclosure, Leak Test, HV Battery, Complete (1140501-00-A)
Kit, Encl Leak Test Adapters, HV Battery (1144879-00-A)
Procedure
Perform th
SEE MORE:
Overview
This section provides the main information about the Tesla Model 3 car, describing its key characteristics, technologies and capabilities.
Here is a general description of the interior and exterior, including details about the interior design, materials used, seating configuration, storage space an
Breather - Front Drive Unit (Remove and Replace)
Remove
Remove the front subframe assembly. See
Subframe Assembly - Front (Dual Motor) (Remove and Install).
Remove the front drive unit breather.
Torque 5 Nm
Install
Installation procedure is the reverse of removal.
© 2019-2025 Copyright www.tmodel3.com
