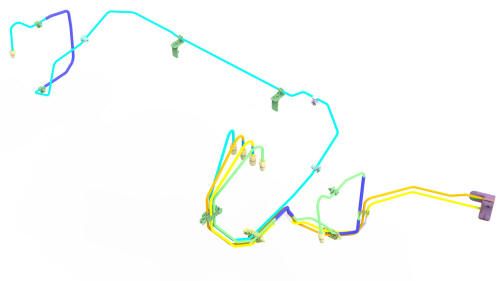
Tesla Model 3: Brake Lines - 4 Tube Bundle - ABS to Wheels - Remove

SPECIAL TOOLS

Flare nut crowfoot set (1079041-00-A)
- Disconnect 12V power. See 12V Power (Disconnect and Connect).
Remove
Caution: Brake fluid dissolves paint. Have clean towels and plenty of water standing by to wash spilled brake fluid off painted surfaces.Note: Dispose of used brake fluid in a manner consistent with local environmental codes.
- Remove LH and RH front wheel arch liners. See Wheel Arch Liner - Front - LH (Remove and Replace).
- Remove the front HV battery skid plate. See Skid Plate - HV Battery - Front (Remove and Replace).

- Release the clips that attach the electrical harness to the LH frame rail.
- Remove the 12V auxiliary battery. See Battery - 12V (Remove and Replace).

- Disconnect the electrical harness from the ABS unit connector.

- Release the clips (x3) that attach the LH front electrical harness to the LH front frame rail.

- Remove and discard the bolts (x3) that attach the LH front electrical harness ground straps to the LH shock tower, and then move the electrical harness aside.
- Position the oil drain under the ABS unit.

- Remove the brake line tube nuts from the ABS unit, and allow the fluid to drain.

- Release the clips that attach the brake lines to the front body.

- Release the clips that attach the thermal beam hose to the body.
- Position the oil drain under the front brake line junction block.

- Remove the brake line tube nuts from the junction block, and allow the fluid to drain.

- Remove the nut that attaches the front junction block to the body.
- Remove the junction block and lines from the vehicle. Note: Move the lines forward, then to the LH side, and out through the LH wheel well.
- Position the oil drain under the front LH brake hose.

- Remove the brake line tube nut from the brake hose at the jounce hose bracket, and allow the fluid to drain.
- Remove the brake line from the vehicle. Note: Move the line forward, then to the LH side, and out through the LH wheel well.
- Position the oil drain under the front RH brake hose.

- Remove the brake line tube nut from the brake hose at the jounce hose bracket, and allow the fluid to drain.
- Remove the brake line from the vehicle.
Note: Move the line forward, then to the RH
side, and out through the subframe.


